A number of years ago a wine box arrived in our house with three very nice bottles of wine, being the " oh that would make.........someday " sort of person I squirreled it away in the garage. Due to putting the house on the market there have been numerous episodes of sorting and tidying , and just like the average soap opera have different levels of excitement , indifference and occasional murders .
"Well where are you going with this I hear you scream at me"
Hang on I am getting there. One of these tidy ups involved me saying yes everything in the garage can go I trust you.
Imagine my horror when I went out to see how work was progressing and saw the wine box on the tip run pile. I immediately gathered it in my arms like a lost child and said I promise not to remove anything else .
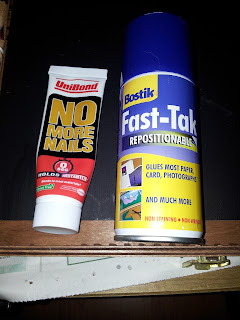
These two products were great
I really had a tough job lining the base . I nearly gave up and
even considered blackboard painting the base.
To do the lining I actually got the size I needed and hemmed all four sides I used red as there is red in the notice board fabric.
I decided the glue would not be enough to hold fabric up the sides so stapled them, only trouble with that brainwave was that the staples came through the sides , now have to think about what to do with the protruding staples.
So far I am pleased with the outcome, I am more than confident that there are crafters out there that would do this a lot neater ,but I am happy with it so far. I have added to picture hooks but they do not do the job I wanted so need to rethink. I also put string accross board to stop flapping of notes ect.
I want to put a ribbon around the bottom where the staples are just to pretty it up .
So as you can probably see I have a number of things fitted in here. I have used the two halves of an Iphone box as storage. There is a stack of pots with paper clips Another pot has chalk and the third one my ear phones, I plan to store phone cable as I am always losing it.
The Blackjack tin has bluetack and ither bits and bobs in. Under the address book is my cardmaking tin, I have sold the majority of my card making kit but kwpt just a few bits . There is glue and screen ipes along with a stapler. I bought a 3 for 2 offer on Pens note block and a card index on a ring. I had hoped to hang this but thad did not work out.
I have also put in tissues well you never know when they might be needed.
So that is the tour I will be adding bits and pieces along the way for now I need to organise what I have and fix them down.
I would really value your opinions and further ideas please


5 comments:
Hi Tracey
I'm not much help on the craft suggestions, but I am admiring from afar!!
Judging from your last comment over at mine - maybe you should write BlogAddict's 'To Do' List at the top of your chalk board!
Wrenx
Thanks for stopping by Made in a Day! This is a really cute idea! Come by and link up your blog button at my Blog Hop and then stop back by on Thursday and link this up at my Linky party to promote this post. Then check out my Blog Party list (top link bar on the blog) and link this post to other bloggers all week! that's the best way to get your blog noticed! Good Luck I'm your newest follower!
Just tip I learned too late~ What I would do for this post is to make the pics much bigger and in a vertical row so you don't get distracted while reading. If you want two pics together make them into a small collage using Picmonkey.com You can delete this comment, after you read it- Love that box! I may have to hit up the local wine store for one of these! Also join Hometalk.com and link up your projects! I get a lot of traffic and following from them.
Kim
Sorry to keep writing you~lol, Here's another way to get traffic~ Pinterest is my number one traffic source. So take your last finished pic of your wine box and take a few pics of it in different scenarios around your house. Tip for taking pics~ turn the lights off in your in the room and find a spot that has good natural lighting. Then when you edit the lighting brighten it up. It will take the weird warm glow off of the pic. and then upload them to picmonkey.com and edit the lighting, add a catchy title and watermark your blog url somewhere small on it. Then make the best pic of the finished product your first pic in the post. Then add the new finished pics at the end of the post. Pin all the finished ones to Pinterest to different boards. Then make a board for your blog and place it somewhere on the bottom of your board page or hide it. Then you can pin those pics to that board whenever you want and they wont be duplicated over and over and clog up other boards. Look at some of my posts and pics. The best time to pin pins is in the evening. Good Luck! I hope I helped you! Link up at my blog hop today and I'll feature your blog next week!
Kim
It’s actually a great and useful piece of info. I’m happy that you simply shared this useful information with us.
Post a Comment
Hi there! Thanks for visiting today. I would love to hear from you.